Perhaps too late for Halloween this year, but certainly not less inspirational! Let’s celebrate creativity with this new tutorial. This time we’ll discover the costuming world of Game of Thrones.
After a long period of trying to keep this exciting project silent (just to give myself a little less stress), I can now finally come with all the details. And they are plenty!
If you have been following my blog, you know that I am always inspired by a variation of TV series and films. From period drama to fantasy, the cinematic scenery and images always speak to my imagination and from there to creativity. I have been working very hard on two amazing pieces from the enormous TV series Game of Thrones. I wanted to make a twin piece, and what immediately came to mind: Ygritte and Jon! (Pre season 6: Have you seen this picture already?). Click here to see my article on how to make Jon Snow’s fur, ecologically! And click here to see my Youtube video on this costume!
I based my design on this version from the show

I like that guy on the right haha!
The process was long and hard, as always, but again very insightful and the new fabrics and techniques were so exciting. I always enjoy learning something new (said the proud autodidact).

This is the result. If you have seen my last (and first) project inspired by the TV series from Outlander, you know how much I can meddle with one particular project. The most irritating thing always being the pattern (argh).
Research
One thing DIY’ers and cosplayers might rush is the necessary research. For me it always takes up 1/3 to half the process length. This time it was again searching for a picture of every side of Ygritte’s costume. And since her costume is rough and “wild”, the patterns are not at all symmetric or thought through. When you see it you immediately think that the suede pieces are just “thrown” together. And I do believe that is not far from the truth! And that was the most ironic part, creating a pattern that was not really thought through in the first place but remaking that random pattern into something that is thought through.. Huh?? Anyway, the pattern is bizarre, but I got it alright in the end.
Here are all the necessary views I could find:
Front: Best front view, Jacket details, Paint details, First length (before cutting the coat to a shorter length*), Seam and thread details, Layers (good look at what the inner flap of the coat looks like), Right, Front
Back: The Only Good One I Could Find?
Left side: GIF (too fast), Seams (shoulder and sleeve), Left
Right side: Sleeve, Right, Right, right and back
Hood: Front hood, Right side, Left side & Details, Right side, Left Side, Right Side
Other: Wildling necessities
*Beware: You might have noticed in the given pictures, that at one point during the series, Ygritte cut her coat shorter. You can see the difference by comparing this and this photo. The colour differs as well. I think the first costume reflects the harsh cold, whereas the second one is the transformed coat, being a bit more “melted”, and thus adapted to slightly warmer weather.
As you can see, finding pictures of the back and the sides was very hard. Of course because those are not quite interesting for the series. Except for us of course! I found a gif of the back which showed just enough and gosh, I was happy! The few things that were one big guess were the sides. These are never shown because she never quite lifts her arms (apart from one gif I posted). Other cosplays that I have seen seam the pattern at the sides as if it were a normal coat. But since it is not, and since she is a wildling, I have no seams on the sides. This results in a more floating and rough look on the costume because the front pattern continues on the back to close in the seams shown in the back gif. After analysing every picture thoroughly, which took me some weeks, I sketched the general layout of her costume as I saw it.
{Photo coming soon}
Now I could concentrate on the other things I was going to need!
The fabrics
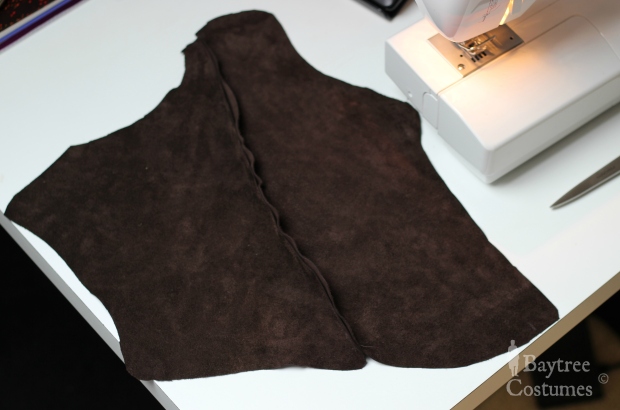
One advantage of this project was that I only needed to buy two types of fabric. The disadvantage was that it had to be suede and matching (fake) fur. I could have gone for fake suede as well, it being much less expensive, but I really wanted to go for full quality and texture. I did some research to find the right responsible place that delivers suede, and luckily I found one in time. I bought a 1,60 m2 hide for about 30 to 40 euros. The colour was amazing, the texture even better. It felt soft and the leather side was very genuine and flexible. It was nice high shoe and bag quality and I loved it!
FAQ Why brown? Ygritte’s costume is grey! ~ You are absolutely right of course. BUT: underneath that grey you can see spots of brown coming out to the surface. The white lies as a translucent layer over the brown undertone. Thus, the suede had to be brown to after that be covered with white (paint).
The fur was quite another issue because it had to match the suede. The fur has a short haired and bobbly texture, so the fabric that would match most is fake teddy / borg fur. When I opened the box which contained the bought (fake) fur, I really understood the pain of online fabric shopping (since I had already been to any other local store). It wasn’t close to the colour the picture on the website showed. It said “light brown” in the title, but the picture showed a more fox / brown fake fur. Turns out it was much lighter than expected. After this post, I am going to dye it using dark tea. So, thankfully no harm done there! I’ll update the photos after I’ve adjusted the colour.
Necessities
- You will need your fabric (recommendations in the paragraph above) – I used approximately 1,60 m2 of suede for an M (EU) size costume.
- Your fake fur. I’d recommend fur that is called “teddy” or “borg”. I bought 1 x 1,50 m (≈ 40 x 60 inches) fabric and that is more than enough. Probably 0,5 x 1,50 m (≈ 20 x 60 inches) would do as well.
- Your pattern (tutorial further on)
- Scissors, thread, sewing machine (or a needle and lots of patience – actually: you need a needle anyway! A leatherwork needle.)
- The right sewing machine heavy duty needle
- A teflon sewing machine foot or a tape covered foot if you use genuine leather
- Hessian sort of rope (for the hood and decoration / detailing)
- One big (brownish) button
- White paint (I used special “snow paint” which is very thick and has a lot of grainy texture to it. It also doesn’t crack or stiffen the fabric.)
- Optional: snow spray to add an extra dimensional layer.
- For the pants I used matching brown high denier tights. This would give some more circulation of air since I am not (yet) going to walk through actual lands of ice with the costume.
The pattern
This time I took a different step into making my own pattern from scratch. One big improvement on my previous newspaper fittings is my posture identical dress form. Rushed as I was, I dived into a new idea taping newspaper together on the form, drawing the pattern out, cutting out the newspaper and: the pattern. Well, that was a nice try ;). Turns out that bin bags are much easier to use for pattern making since they are not that irritatingly stiff when folded. The base of the idea was quite good, so after the alteration I began drawing the pattern out on the bin bag covered dress form using all the pictures I had collected. When I was satisfied, I cut it out and began sewing a prototype. The prototype was overall amazing already, but I did get the chance to change and alter some weird folds or too long / too short pattern pieces. But it immediately turned out the pattern drawing idea was the best ever.

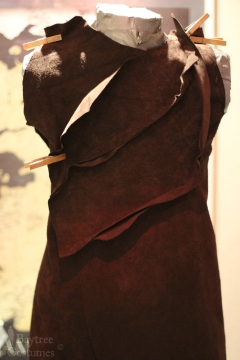
The left three pieces form the front, the right three pieces the back. The piece on the far left should be filled up to more of a square form since that will be the front underlayer.
As you can see, the pattern is very irregular and very much eyeballed. If you want to know how you can make a pattern yourself, read on. Otherwise you may skip the boring stuff and get working on the actual sewing.
How to make Ygritte’s Pattern in steps
When you are making your own Ygritte pattern, you can use your body dress form (I used my duct tape body double) or, if you don’t have one, you could beg a friend or family member to help drawing the pattern on you :).
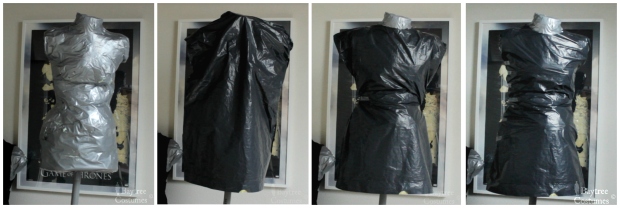
- Step 1: Use something that is easily foldable as a medium for your pattern. I used a bin bag. They are awesome. Get a marker and enough reference pictures.
- Step 2: Cut three holes in the bin bag. One for the head, two for the arms.
- Step 3: Now you have a sort of sad halloween costume ;). Now, use some tape to adjust the fit.
- Step 4: Now you, or your lovely friend, will draw the pattern on the bag. This might take a while.
- Step 5: When you are sure where you want every line and thus seam to be where it is, cut every piece out.
Now you have your pattern pieces! I’d suggest that you make a prototype using these pattern pieces first. You’ll need to fill up some pieces as well, for instance the front that lies underneath the closing part. One layer of bin bag can’t give you more than one layer of the total pattern.
Last important notes
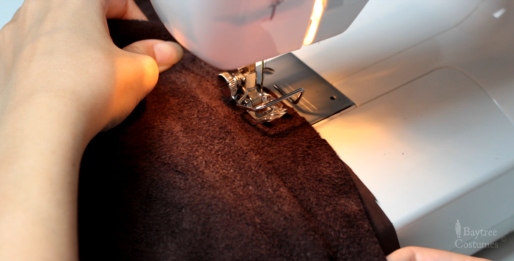
Important: Most of the pattern pieces are sewn right side out instead of wrong side out which gives the signature look of the fur peeking out everywhere.
But! Not every piece is stitched right side out on the coat (so that the fur falls out on the right side of the coat). After much study on the pictures, I could see that the shoulder seam as well as the sleeve seams are mostly done with the seam on the wrong side of the fabric instead of it being on the right side.
Sewn right side out! This way the fur can be easily attached
Sewing Step-by-Step
- Step 1: cut out your patterns with care. Mind the warnings I gave above. Also remember that the seams will fall right side out (except for sleeves and shoulder), so you will have to mostly seam on the right side of the fabric. This will allow you to later attach the fur to the out sticking seams to give the illusion that the fur came from within the costume as if it were a real hide. Because of all this, you will have to mind carefully how to cut out your pieces. The opening will close over the inner left side on the top of the left side if you view it from the front.
You would also come across the problem that the pattern pieces cannot be sewn easily on top of each other as you are used to on the sewing machine. You’ll have to use the easing technique (also done with princess seams).
Which means you’ll start sewing out normally, but as the pieces want to go different ways, you’ll pull one of them back to where you want it to be. Not sure what I mean? Try watching this easing part of how to sew a princess seam video. You can always comment down below when you have questions.
Of course you think: but this will create bumps and stuff where I don’t want them to be! Yes, you can go the alternate way to avoid this problem, but look at my result. Except for some awkward floppiness here and there, it still looks good. If you want to go the easy way, go this way!
Easing the leather
- Step 2: Begin sewing every piece together. I began sewing the front pieces together first, which went right with my prototype, but later wrong with the actual piece. I would suggest to sew the front 3 pieces together lastly so that you know for certain where to attach them. Use your dress form and clips and chalk to mark where you want the lines to be.
Not really right here..
- Step 3: Now that you have your general unsleeved and unhooded costume done (woohoo!), you can begin cutting out sleeve patterns and the pattern for the hood. Leave some extra pattern space at the front of the hood so that it can be flipped back. This will later serve as the base for your fur that falls back from within to over the hood.
- Step 4: Attach those (I remember this being so frustrating at first, since I never did a proper sleeve before – yes, true confession).
- Step 5: Consult the pictures again to get a desired diagram in your head of how and where you want to attach the fur (lining) and how you want to let it fall. I used the general layout and started lining every outsticking seam of the coat with fur by hand with needle and thread. I stitched every piece of fur firstly in the middle, then I attached the fur right and left below the fur to both sides of the seam to then create a fold in the middle as an illusion of the fur coming from within the coat. You can also attach the fur to every pattern piece before sewing everything together if you really want to have it peeking out, but because nor my sewing machine nor my energy would allow it, I went for this approach.
- Step 6: After you’ve got your fur attached, start creating rough edges of the fur with your scissors to make it even more “wild” – which means cutting slits into and parts out of your fabric to give it a more 3D effect. This will give the illusion of rabbit fur or other animal fur hanging from the coat (definitely on the back this will look amazing). Don’t forget that the hood is lined with fur from within and then folds over the edge of the hood.

It looks so brown..
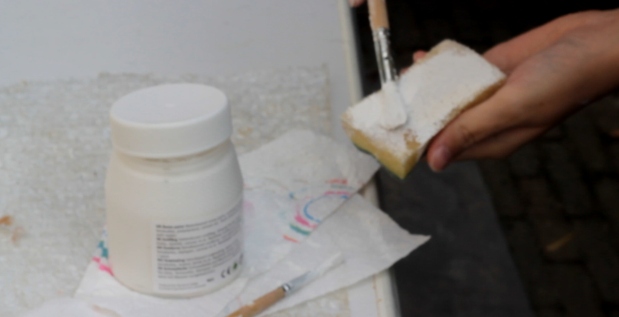
- Step 7: This step is the best one so far! After all this mental work you can finally bring in some fun. Take your costume outside, get your paint (I used snow paint) and carefully dap it on your costume. I used some sponges for this and for the details a paint brush. When you apply the paint, you should keep in mind: don’t forget the brown spots (I frequently reminded myself this out loud). When you are busy, maybe with some music on, you would easily forget that you should not cover it equally everywhere. On some pictures you can see that the costume designer used a sort of faint imaginary chess diagram. Diagonal blocks of brown and white. Of course not as drastic as that sounds, but the original piece does give that impression a little. I followed some general key spots on where to put more or less paint from the reference pictures, but from there I just followed my own pattern. Just have fun! When I detailed it afterwards, I put some bigger amounts of paint and applied it in the seams, in corners and randomly around the surface as well as on the fur to complete that snowy I-have-just-walked-through-a-snow-storm-look. I really like the results <3. Don’t forget to also paint the tights!

- Step 8: The last step will be to detail your coat further! Ygritte has rope below the fold of the hood to pull it tighter whenever the winds are rising in the north. She also has rope around the end of the sleeves to tighten these as well if the weather is harsh. Further, as seen in the notorious scene that took place in the cave (yes, yes), she opens the coat left (for us, so right for her). Through the process I kept closing the coat with a clip, but now that it was almost finished, I attached a brown button to the inner layer of the coat in the right place and cut a slit into the top layer so that it would keep the coat neatly closed. The button is nicely hidden away below the fur.

Hidden button and details


And just to say: the process of this costume will never really stop. I’ll always finds spots to touch up and things to put right. I’ll always need to dap a bit more paint there and there.. And it is definitely not even near to where I want it to be!
Next upload will be: Our Jonny boy. That project is quite cringe worthy, it was so mathematic and rational compared to this costume. And much more terrifying to make! Beware of coming anekdotes. Update: go here for a post on Jon Snow!

Winter is coming!
I’m also postponing further Outlander tutorials to next year (so sorry for that) because other important projects are pushing the rest away. And apart from that, my personal life couldn’t be busier at the moment. Next month however, something big will come up. So definitely subscribe to receive the biggest update untill now in your mailbox.
Subscribe, like and comment if your were inspired! ❤

Hey, thank you for making such a detailed post! It’s being really helpful while making my own cosplay. I just have one question: roughly how much snow paint did you need? I’ve been looking around at different bottles and I don’t want to end running out and having no time to get a new bottle!
LikeLiked by 1 person
Hi Marjolein!
Thank you so much for your lovely comment. I didn’t use that much snow paint at all, really! My bottle contained 250 milliliters, I bought it at a Dutch shop called Pipoos. I didn’t even use half of it! But the coverage over my Ygritte costume wasn’t that thick. So if you want to go super safe, you could buy more than 250ml, but for me that was definitely more than enough. Hope this helped and good luck with your cosplay!
~Ava
LikeLike
That’s actually great news for me, because I’m Dutch and there’s a Pipoos near me! Thanks for your reply!
LikeLike
I figured from your name so that’s why I thought I’d add that to my reply :D. You’re welcome!
LikeLike
As a huge Game of Thrones fan, I have to say your costume looks awesome, even though you had to struggle with finding reference pictures! I like the look of the fake snow as well, it definitely makes the costume stand out. Thanks for sharing!
LikeLiked by 1 person
Thank you sooo much for your comment telling me what you think of the costume! You absolutely made my day ☀️ Thanks Rachel!
LikeLike
Thanks a lot for your post! Me and my boyfriend are gonna cosplay Ygritte and Jon Snow for a party and your post will help me along great!
LikeLike
Hi Dorien! Thank you soo much for your lovely comment. Have a lot of fun!! And perhaps post me a link of a photo when your cosplays are finished! I would loooveee to see them.
Have a lovely day,
Ava
LikeLike
Hey!! I really really love your costume! You did a great job.
Where did you bought the suede if I may ask. Im also planning to make the Ygritte costume (for me) and Jon Snow (for my BF :D) I am searching for a while now, but I don’t seem to find the right shop for me. I never made a costume before I have to say 😛
Thanks in advance! (im dutch too 😀 )
LikeLiked by 1 person
Hi Jennifer!!
Thank you so much for your lovely comment! Awesome you are Dutch as well ;). I bought the suede from echtleer.nl . They are amazing helpful people and they will help you in an awesome way – even with vague sentences like: “I want it to have texture but not too much..” or “I want it to be a thicker leather, but still supple.” They will even understand those things haha. I think I got enough material for Ygritte and Jon Snow for 100 euros. Good luck and have a lot of fun ;). The costume(s) seem a little difficult, but they are very doable! And you’ll look awesome. Thanks again for posting your comment, it made my day!! ❤
~Love, Ava
LikeLike
Btw – I was looking through your Instagram. Damn you are really talented!! Keep up the great sketching and being creative.
LikeLike
I just have to say that your tutorial is really helping me immensely! I am just starting in cosplay and all and I have a question about the front of the coat. There are like “leather threads” for the lack of a better word to hold the fur to the coat. Could you tell me how did you do that? I was thinking whether they actually did sew with leather strips in the original or are they just glued in place somehow? Wrapped around it? I have absolutely no idea about sewing that’s why I’m asking XD
Thank you in advance!
~Lina
LikeLike
Hiya Lina!
Thank you very much for your comment ;). For the front of the coat I sewed the pieces of leather with the seam on the outside. You make this by attaching two pieces (or more of course) of leather to one another. When you do this, you create something like in this picture https://sew4home.com/sites/default/files/1296-Photo-107.jpg. This is what I think you mean with the leather strips. In fact this is the seam you created sticking out on the ‘wrong’ side. I did this to be able to attach the fur to the outsticking leather.
I then took a needle and a thread, and started attaching the pieces of fur to these outsticking seams. First attaching them through the middle, then on both sides on either side of the seam itself.
If you need any more help or if anything is unclear. Let me know! ❤
~Ava
LikeLike